
First and foremost, I must ask you to bear with me. This is only my second (real) tutorial that I have attempted. I first found this technique in a tutorial for Photoshop and I really wanted to give it a try, but alas, I have Paint Shop Pro. It is such a shame that the two are so very different and often times it is extremely hard to convert the ideas from PS to PSP. The terms are so different and certain things are not available in one that are in the other. (But PSP is at least affordable 🙂 )
That being said, here goes….
I’m using Corel Paintshop Pro X7 – you should be able to use earlier versions.
First of all, pick your 5 images. (3, if you want to start small) It is not absolutely necessary, but it makes it a bit easier if you open them into PSP in the order that you want them to be in your final image.
Once you have your images, make them all the same size. I like 1024 x 768. I tried it once with smaller images, but the final product lost some of it’s clarity.
Here is where the fun begins…. In your script drop down, find PrepForStitching* Before going any further, let me clarify, there cannot be ANY other images open (or even minimized) when you do this. This will stitch your images together as seen here:

There will be a pop up window asking if you want to delete the current layer, go ahead and select yes.
If your pictures are in the order you want them, proceed to the next step, but if you want to rearrange them you can as they are each a seperate layer. Leave them that way for now.
Now you will need to resize your canvas without changing your pictures. To do this go to Image/Canvas Size. In your new dimensions type in 6000 wide and 2500 high, making sure you are working with pixels. This will be a big image, but you’ll be resizing it when you are all finished.
Background transparent, placement center; don’t worry about the numbers on the right, they are automatic. After you have resized your canvas, it will look like this:

Each of those images are still separate layers. At this point it is a matter of preference. I like to put a narrow (usually white) border around each image. I do this by selecting the layer (magic wand/all opaque) and adding a new layer. From Selections menu, choose modify/expand and add 15 pixels. (More or less, depending on how wide you want the border). Make sure your new layer is below the image you are working with and then flood fill with border color. Select image layer and merge down. Deselect and repeat for remaining images.
Once you have the borders applied, go to the view drop-down and select “grid” (ctrl+alt+G) , you will now want to resize the grid. From view drop-down, select “change grid”. Again this is a matter of preference, but I resized the current grid to 100 x 100 pixels. This is just to give you some guidelines.

Starting with the layer 1, hold down shift and press the left arrow 6 times to move image to the outside. Do this again with layer 5 and the right arrow. Move 2 and 4 toward the outside, but press the arrow only 3 times. Your images will now be evenly distributed and easier to work with. You may or may not want to add drop shadows to each image before going on. I find that with dark images, it doesn’t work as well.
Now choose pick tool, set at perspective. If you used the same sizes for your images and the same settings for your grid, then you can do this with the following steps:
Beginning with image 2, grab upper left corner and pull it up two grid-lines. With image 1, use the inside corner, pull it up two lines, and then on the outside corner by three lines. Do the same with images 4 and 5. Once this is done, you can deactivate the gridlines in the view menu.

If you want to leave the bottom of the images in alignment with the bottom of the center image, use “Free” instead of perspective, being careful to keep the vertical lines straight.
Now you will be moving the images closer together. Just do this so they are where you want them. Make sure the center layer is on top and the other ones are tucked underneath prespectively. Once you are sure they are where you want them, merge visible layers. Move merged layer up so it’s off from center. Duplicate layer. Making sure you are on the bottom layer, flip vertical, and move it so it’s just under the edge of the top layer.
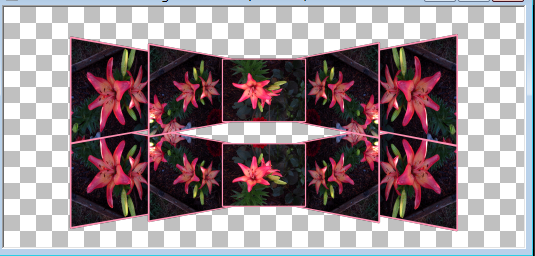
Add new raster layer and flood fill with black.
Select the bottom set of images and got to:
Effects/Photo Effects/Graduated Filter: Select the far left style and the top preset.
If the shadow is not on the bottom as seen here, press the arrows

Keep adjusting until you have it where you want it. You may have to select okay and go back and forth until your image until it looks the way you want it to. You can do this by dragging the line up and down. (bottom blue pointer).
Once everything is the way you want it , you can resize (I set the width to either 1024 or 1500; lock aspect ratio, checked.
Here is my finished product.

Below you will find my first and second attempts: (leaving bottom edges straight)


The final image, as you can see, I had something different than the black background. I played with the blending modes until I got what I wanted and then added a couple of picture tubes.
I hope this is helpful.
*some versions might not have prepforstitching ( I can’t remember which ones, because I have continually upgraded) but if you don’t have it, I believe it can be googled and found. If not, then there is a lot more work in this process.
See my next blog for the alternate process and a short tutorial on scripting.
Good luck and have fun!
Simply Shar♥n
